The R class R programming for biologists
An introduction to Git and how to use it with RStudio
What is version control?
 (from phdcomics.com)
You know that great paper you just wrote, you were done with it, so you called it “final”. And then, you sent it to your advisor for her last comments. So you renamed it “final_thisone”. A few days passed, and you realized there was a typo in your figure, and you renamed it “final_thisone_really”. A couple of weeks pass, you get comments back from the reviewer, you start changing it and you renamed your file “final_submitted”. And then… your advisor think you should rewrite the conclusion and the file become “final_submitted_really”.
A year pass, you are mentoring a new undergrad in the lab, and she asks you for your final document so she can look at your methods… You open your folder, and mesmerized by the number of final labelled final, you forget which one if the correct one. Sounds familiar?
Version control is a category of software that keep track of changes to your files for you. It allows you to:
- keep the entire history of a file and inspect a file throughout its life time
- tag particular version so you can go back to them easily
- facilitates collaborations and makes contributions transparent
- experiment with code and feature without breaking the main project
Version control is designed to manage source code. It works best when tracking files stored as plain text and not encoded as binary (e.g., Word documents). It is the “lab notebook” of the digital world. Because of its powerful and useful features, it is being used for many different project and can be used to track data sets (small), text (if you haven’t written too much of your dissertation, you should use version control to keep track of it), images, and much more.
What is Git?
Git is a particular implementation of version control. It’s really powerful and has many features but we will only scratch the surface.
What is GitHub?
When you start a Git project on your computer, you are going to store the entire history of the project locally. The storage of your project and its history is called a repository. It is fine. However, the great advantage of using version control such as Git is to be able to collaborate with other people (and also to store your repository somewhere else).
GitHub is a commercial website that lets you store your repository publicly for
free (you need to pay if you want to keep them private, you can also get an
educative account with an .edu email address that will give you some free
private accounts). There are other website that offer similar services including
BitBucket. Storing your repositories on these website has many advantages. It
offers a friendly interface to many common operations so that you don’t have to
remember how to do them at the command line. They also provide other useful
features including an “Issue tracker” and wikis.
The Git workflow
We have already “committed”, “pulled” and “pushed” but we haven’t been through the details of what it means how these pieces fit together.
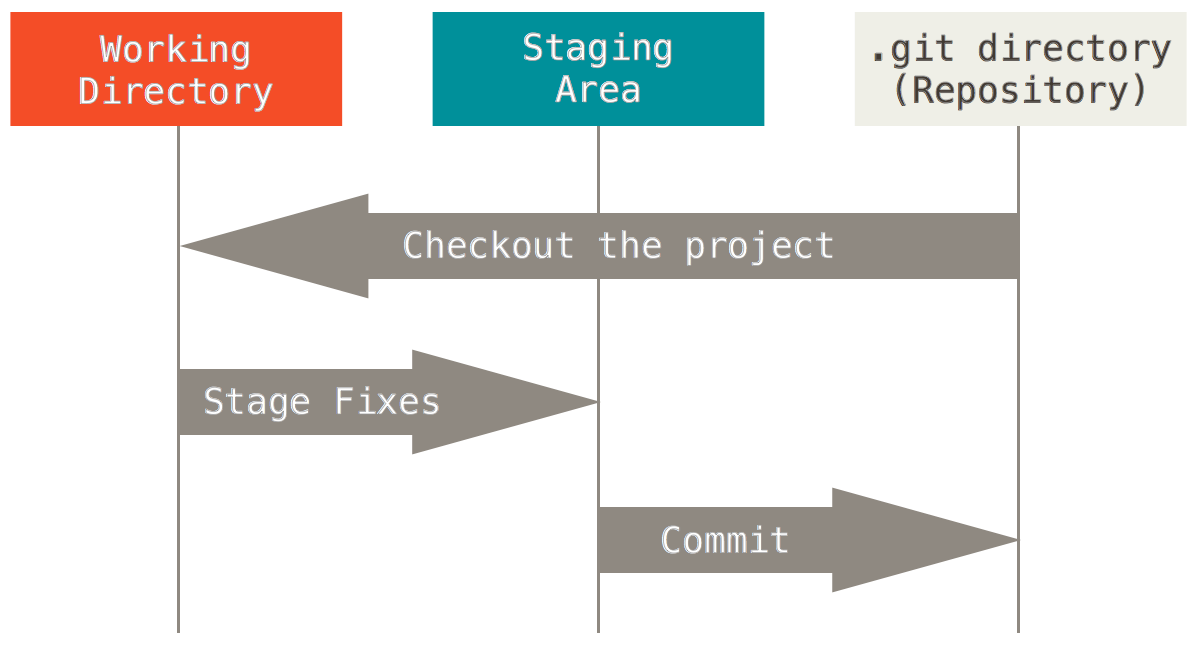
The typical workflow goes like this: - you create/edit/modify a file inside your repository - you stage the changes to the staging area - you commit these changes which creates a permanent snapshot of the file in the Git directory along with a message that indicates what you did to the file.
When you start a new project, the files in your working directory are untracked, you will first need to add them to your repository before Git can keep track of them and their history.
At this stage, everything is still on your hard drive. To upload your modifications (i.e., your commits) to GitHub you need to push to it.
If you are working with other people you are also committing your shared repository on GitHub, you will need to pull to bring their modifications into your local copy of the repository.
Commits are cheap. Commit often and provide useful messages so you can keep track of what you are doing. Don’t do this:
 (From xkcd.com)
Branching
Branching is a great feature of version control. It allows you to duplicate your existing repository, develop or experiment with a new feature independently, and if you like what you are doing you can merge these modifications back into your project.
Branching is particularly important with Git as it is the mechanism that is used when you are collaborating to external projects (projects you are not directly involved with).
RStudio can’t create branches directly, so you need to either:
- create them in GitHub and pull the changes in your repository;
- create them from the Shell (Tools > Shell) and type
git checkout -b
new-branch
Pull requests
With a pull request you are asking someone who maintains a repository to pull your changes into their repository.
To issue a pull request:
- First, you need a copy of the repository that contains the code you want to improve. To do so, you will fork it from its original location. You will also need to tell Git that this a copy of another project (a.k.a., upstream)
- You need to import the code onto your computer. To do so, you will clone your fork to your computer.
- Now that the code is on your computer, you can edit and modify it. Once you are done you can push it to your repository.
- Once the code is in your repository, you can issue a pull request so the original owner of the code (upstream) can review, comment, accept (or reject) your proposed modifications.
- At some point, you will need to pull changes that occur upstream into your own repository if you want to keep contributing to the project.
How to do this using RStudio and GitHub?
- Go to the repository page on GitHub for the project you would like to
improve, and click on the “Fork” button in the top right corner.
 This will create a copy of the repository in your GitHub account. For
instance, if I fork
This will create a copy of the repository in your GitHub account. For
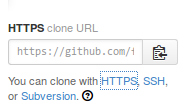
instance, if I fork https://github.com/r-bio/challenges-francois, it will create a copy athttps://github.com/fmichonneau/challenges-francois. - In RStudio, go to File > New Project, and choose “Version Control”, select
“Git”, and type the repository URL found in your copy of the repository
listed in the right column on the GitHub website.
 In our example this would be
https://github.com/fmichonneau/challenges-francois, and choose an appropriate location on your hard-drive to store the project. - After a few seconds, the content of the repository should appear in the “Files” pane in RStudio.
-
At this point, we need to tell Git that this project has an upstream version. There is no way of doing this within RStudio, so you need to enter some commands in the shell. Go to Tools > Shell, and enter the address of the upstream repository (in our example
https://github.com/r-bio/challenges-francois):`git remote add upstream https://github.com/r-bio/challenges-francois`Make sure that it worked by typing
git remote -v, it should display 4 lines, 2 that start withoriginand the address of your fork, and 2 that start withupstreamand the address of the upstream repository. Note that here we usedupstreamto name the upstream repository but we could have given it another name. In this case,upstreamis just easy to remember and accurate. Keep your shell window open. -
We are now going to create a branch for our changes so they are self-contained. There is also no way to do this within RStudio so we are going to enter additional commands in the shell to create it:
`git checkout -b proposed-fixes master`Here,
proposed-fixesis an arbitrary name we give to our branch. Ideally, you want to choose a name that summarize what your proposed changes are about. After seeing the messageSwitched to a new branch..., you can close the shell window. - Open the script you would like to modify, and change the code as needed. Save your modifications.
-
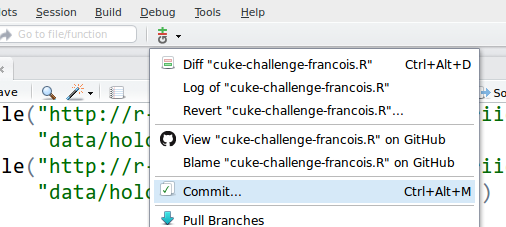
When you are done, commit your changes:
 Click the staged checkbox for the files that are affected by the
modifications you want to commit to your repository:
Click the staged checkbox for the files that are affected by the
modifications you want to commit to your repository:
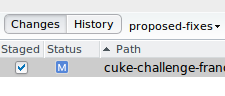 Make sure that you are in the correct branch, (
proposed-fixesappears next to the History button), and write a commit message: The first line should be short (< 50 characters), additional details can be given after skipping a line: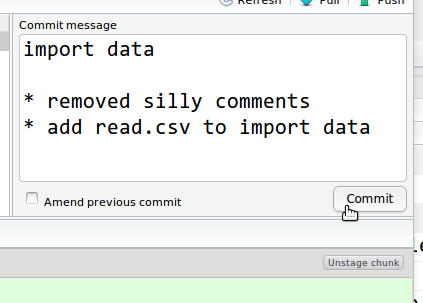 Close the window, and go back to the shell. There, type:
git push origin proposed-fixesThis command sends your modification to your fork on GitHub.
- Go to GitHub to view your fork, in our example that would be:
https://github.com/fmichonneau/challenges-francois, and click on the green icon: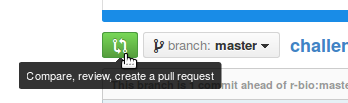
- Make sure that the correct branch is selected in the
comparedrop-down menu in the top right, and click on the green button: “Create pull request”. - Leave a message with some explanation for your proposed changes and suggestions and click on the green button “Create Pull Request”. This will send a notification to the owner of the repository who will review your request.
What to do if you receive a pull request?
If you want to accept the pull request, you can click on the “Merge pull request” button in your repository, and after adding an optional comment, click again on the “Accept pull request” button.
After that, you need to import (pull) these changes into your local copy of the repository. You should be able to do pull the changes by clicking on “Pull branches” in the “Git” menu of your R project in RStudio.
Exploring further
There are many resources on the web to learn about Git and GitHub:
- Git Tower provides a nice infographics that illustrates how the differents parts of the Git workflow fit together. Git workflow
- An excellent (but maybe too comprehensive for beginners) is the Pro Git Book. This chapter is great to learn how to use GitHub to contribute to a project.